Tiling Panel
Most file export dialogs display the option for tiling the output file into a series of smaller files. The tab also appears for some tools that create new layers during their processing. Tiling of the output files or layers can help to manage large datasets, and also takes advantage of multi-threading to process each tile.
For additional information on loading tiled datasets see Create New Map Catalog
Note: Global Mapper does not contain a specific tool to mosaic raster data into a single file. This would be the opposite process of tiling data into multiple files. To combine tiles or other data into a single file, load the data into the workspace, and then export from the top level file menu. All supported data will be combined or merged in the output file, in a way that matches how it is displayed on the screen.
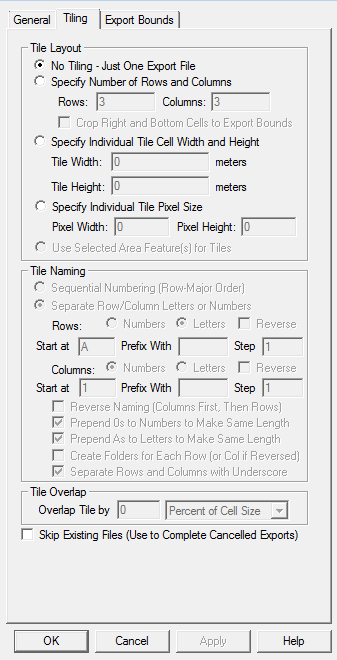
Tile Layout
The Tiling Panel provides the user with the means to easily split up data on export into a regularly spaced tiles if desired, using one of the following options:
No Tiling
This option means that no tiling will be done, only a single file with be exported with the full specified export bounds. This is the default option.
Specify Number of Rows and Columns
Specifies that the data should be broken up into the given number of rows and columns of tiles. Every tile will have the same width and height unless you check the Crop Right and Bottom Cells to Export Bounds option, in which case the exported tiles along the right and bottom may be slightly smaller than the other so that no data from outside the specified export bounds is used.
Specify Individual Tile Cell Width and Height
Allows the user to specify the desired width and height in ground units that they wish each cell tile to be. Every tile will have that width and height, which means that the right-most column and bottom-most row of tiles could go beyond the specified export bounds. If you specify negative cell width and/or height values, the grid tiled cells will be snapped to the right and/or bottom edge(s) of the export bounds rather than the top left.
Specify Individual Tile Cell Pixel Size
Allows the user to specify the desired width and height in pixels that they wish each cell tile to be. Every tile will have that width and height in pixels, which means that the right-most column and bottom-most row of tiles could go beyond the specified export bounds. This option is not available for vector-based exports since it does not make sense for those export types.
Use Selected Area Feature(s) for Tile Cells
This option will export a file for each area feature selected with the Feature Info or Digitizer Tools. When you select this feature, you will be prompted to select how to name the files based on each area. You can choose from using the display label of the area, the filename of the file that the area was loaded from, an attribute value of the area, or just a simple sequential numbering scheme. You will also be prompted to choose whether each export should actually be cropped to the polygonal boundary of the area or should just use the rectangular bounds of the area's boundary. Note that when you select a filename to save to after this, the filename portion of the selected name will be pre-pended to whatever is used as the tile cell name. So if you want just your selected item (i.e. attribute, name, etc.) and nothing prepended, only specify a period and then the extension when selecting the base output filename, like '.jpg' for JPG output.
Tile Naming
If the user chooses to breakup the data into a tile, then the options in the Tile Naming section will apply and allow the user to control how the individual tile files are named. The following naming options are available:
Sequential Numbering (Row-Major Order)
With this option, a number starting at 1 for the top-left tile will be appended to the selected export filename. The number will increase across each row.
Separate Row/Column Letters or Numbers
With this option, separate indicators will be appended to the selected export filename for the row and column. If letters are selected, the letters A-Z will be used. If more than 27 letters are needed, multiple letters will be used (e.g. AA, AB, etc.). If numbers are used, the number values will be pre-pended with zeroes in order to make the numeric values have the same number of characters for every output tile. If the Reverse checkbox is marked, the order or the numbers or letters used will be reversed (e.g. if there are 4 rows and numeric naming is selected, the rows will be named 4, 3, 2, 1 instead of 1, 2, 3, 4). The user also has the option of specifying the letter/number to start naming at as well as the option to specify a prefix for each column and row number for each tile and the option to specify by what value numeric names should change by (step) for each successive row or column.
Options
If the Reverse Naming option is checked, the column name will come before the row name in the export filename, otherwise the row name will be before the column name.
If the Prepend 0 to Numbers to Make Same Length option is checked, the longest number will be found for both the column and row names and all other column/row names will have 0's prepended to make them all the same length. The same applies to column/row names using letters if the Prepend A to Letters to Make Same Length option is checked.
The Separate Rows and Columns with Underscore option causes an underscore to be used to separate row and column values in the output filenames. If not checked then no separator character will be used.
If the Create Folders for Each Row (or Col if Reversed) option is checked, a separate output sub-folder will be created for each row (or column) that is exported, preventing too many files from being placed in a single folder.
Tile Overlap
The Tile Overlap section allows the user to specify that the generated tile cells should overlap each other by a certain percentage of the cell size. This option is useful for loading the slightly overlapping result files into something like Photoshop for color matching between cells.
Skip Existing Files
If the Skip Existing Files option is checked, any tile cell file that already exists at the destination location will be skipped. This makes it easy to resume a cancelled export as the already exported files would not be re-exported.