The DataSourceEditor class provides a dialog that can be used to browse and edit the DataSource.
Users may customize the size of the dialog, the position of the splitter between the Folder and Object panels, and the order and width of the columns displayed for each type of object. Columns may also be hidden by right-clicking on the column header and unchecking them.
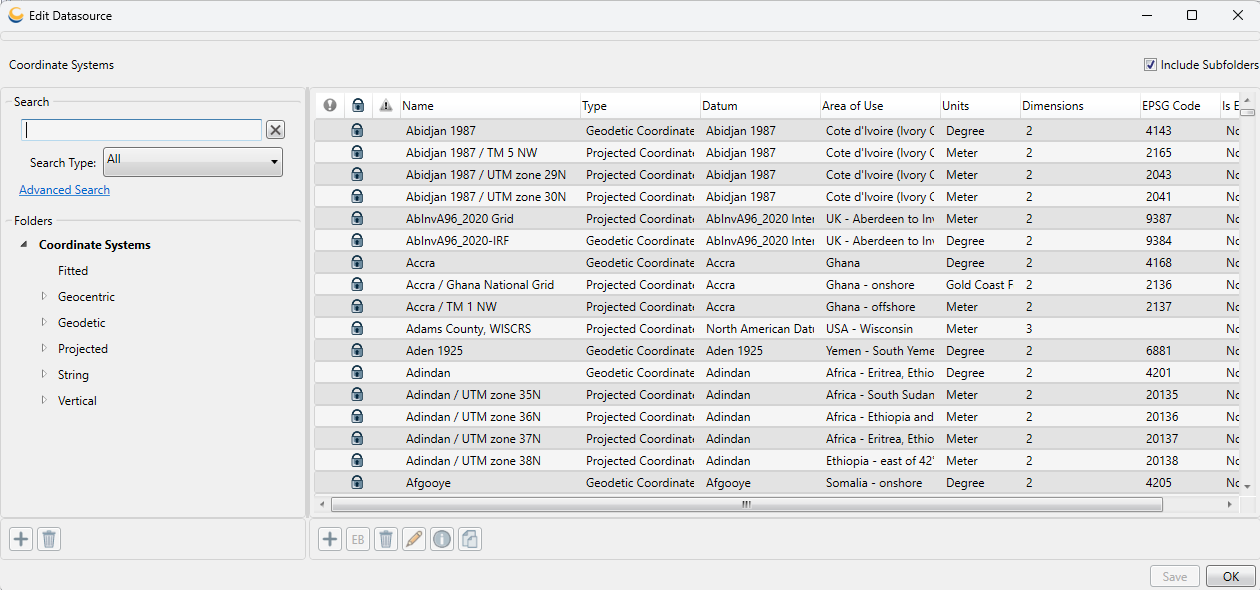
Folders
On the left hand side of the dialog is the Folders list. This list is a typical Windows Explorer style tree view that will organize which ever type of object you are browsing into folders. To explore the subfolders of a folder, click the plus sign to the left to see folders listed underneath. To see the entries at any particular level of folder, click the folder itself.
With a folder selected, the pane to the right will list the individual objects within the folder. Folders can be edited in a number of ways.
Several actions can be performed by right-clicking on this tree and using the resulting context menu. With the context menu, it is possible to add, remove, and rename folders, and it is also possible to clear the recent items history and the search history.
The Folder pane contains some special folders, called "All", "Recent", and "Search History", which appear under the object type folders. When the "All" folder is selected, the Details Pane will show all definitions of the specified object type. When the "Recent" folder is selected, the Details Pane will show some recently used objects of the specified object type. The "Search History" folder can be expanded to view the results of recent search queries. It is not possible to rename or delete these special folders, nor is it possible to create folders under these special folders.
Creating New Folders
To create a new folder, select one of the existing folders, right-click, and select New Folder, or just click the plus sign button below the Folder panel. Note that you may not create new folders under *All*, *Search History*, or *Recent*, or directly under the "umbrella" folders for Coordinate Systems, Single Transformations and Coordinate Points. Any new folders must be created underneath one of the main object type folders (i.e. Projected Coordinate Systems, Angular Units, etc.).
Deleting Folders
To delete a folder, right-click on it and select "Delete Folder". Or, with the folder selected, click the trashcan button below the folder tree.
You may only delete folders that are empty. You may not delete any of the *All*, *Search History*, or *Recent* folders, or any of the master folders for individual object types.
Renaming Folders
To rename a folder, click once on the Folder name and type in the new name.
You may not rename any of the *All*, *Search History*, or *Recent* folders, or any of the master folders for individual object types.
Moving Objects into and out of Folders
You may select one or more objects (use the CTRL key to select multiple objects at once, or the Shift key to select an entire range) in a given folder and then drag them into a new folder.
When dragging and dropping a single object, the user will have the option to actually move the object, to cancel the move, or to create a shortcut. In that case the view will display the object under both the original folder location, and the new location. The user may right-click on either of these copies of the object and choose to "Remove from View". If there is only one copy of an object it may not be removed from the view.
Hiding Folders and Objects
The DataSourceEditor may be displayed in a special mode that enables a user to hide certain objects and folders when the Picker and Editor are displayed normally. To enable this mode, the SetShowHidden call must be made prior to the Show. In this mode, a new "Show" column will be displayed in the Details panel, with a checkbox next to each object. Individual objects may then by unchecked to hide them in the view. You may also click the Show All or Hide All buttons below the details pane to hide all objects in the folder at once, or to show all objects in the folder at once.
If an entire folder and all its contents should be hidden, the user may right click on the folder and select "Hide Folder". While in the Show Hidden mode, hidden folders will display with their names in italics, and all objects contained within will also display in italics (but will not be individually marked as hidden). To display a hidden folder the user can right-click on the folder and select "Show Folder". If a folder containing both visible and hidden objects is hidden, then made visible, the objects will retain there individual hidden or visible states.
Saving Views
Any changes you make to the foldering scheme may be written out to the current DataView xvw file by clicking the Save button. Any changes to the data itself will also be saved at this time.
Objects
As we browse the available objects under a given folder, entries that are read-only will default to being shown in black text and will have a lock icon beside them, while editable objects will be shown in blue and will not have a lock icon beside them.
The individual objects can be selected and the details of those objects viewed by double-clicking the object in the right hand pane. If the object is read-only you will only be able to view the details, and will not be able to change them or delete the object. You may, however, make an editable copy of it. If an object is editable, you may delete it, edit it, view it, or copy it.
Objects that are not currently usable for some reason (i.e. objects that rely on grid files not currently available) will be marked with a red exclamation point. These will be viewable but the user will not be able to select them to return from the picker. In the case of objects that rely on grid shift files, if the user right-clicks on the object they will be presented with an option to download and install the missing files automatically via FTP. If not also locked, these objects will be editable but may only be saved if the edits make the object usable. In other words, you will not be allowed to save an unusable object.
Objects that have been deprecated will be marked with a yellow warning sign.
The Display Name is stored as part of the view, and thus may be altered even for objects that are otherwise read-only. A given object may have only one Display Name.
Several actions can be performed by right-clicking on the Details Pane and using the resulting context menu. With the context menu, it is possible to add new objects, as well as delete, rename, edit, and copy existing objects.
Searching for Objects
To enable Searching you must have a folder selected that is not All, Recent or Search History. This will activate the Search fields at the bottom of the dialog. To perform a search, first select the column to search in (for example, Name). If the search has a set list of possible values (for example, Projection Types) you may then select the one you are searching for from a drop-down list. Otherwise, type in the string to search for. Click the Search button to initiate the search. If matches are found, they will be displayed under a new folder named after the search conditions, under the main Search folder. If you wish to re-run the search at a later time simply click on the appropriate Search folder. Only the five most recent searches will be displayed in this folder.
If you wish to go to the object in its true location, right-click and select "Open Containing Folder".
If you wish to clear out your search history, you may right-click on the main Search folder and select "Clear Search History".
Recently Used Objects
The master folder for each object type includes a special folder that contains the most recently used objects of that type. If you pick a particular object for use it will be added to the Recent list (if it is not already there).
If you wish to clear out your recent object history, you may right-click on the main Recent folder and select "Clear Recent Object History".
If you wish to go to the object in its true location, right-click and select "Open Containing Folder".
Buttons
The Add Folder button adds a new empty folder under the currently selected folder. This button will be grayed-out if the "All", "Recent", or "Search History" folders are selected, as it is not possible to create a folder under these folders.
The Delete Folder button deletes the selected folder and all of the objects that it contains. The user will be asked to confirm the deletion before the folder and its objects are deleted. This button will be grayed-out if the "All", "Recent", or "Search History" folders are selected, as it is not possible to delete these folders.
The Add Object button adds a new object in the selected folder. The type of the object depends on the currently selected folder. Clicking this button will open an ObjectEditor dialog to edit the new object.
The Delete Object button deletes the selected object. The user will be asked to confirm the deletion before the object is deleted. This button will be grayed-out when no object is currently selected
The Edit Object button will open an ObjectEditor dialog that can be used to edit the selected object. This button will be grayed-out when no object is currently selected
The View Object button will open an ObjectEditor dialog that can be used to view, but not edit, the selected object. This button will be grayed-out when no object is currently selected
The Copy Object button will create a copy of the currently selected object. The copied object will be equal to the original object, except it will be given an unique identifier and a name that is "Copy of <original name>". Clicking this button will open an ObjectEditor dialog that can be used to edit the copied object. This button will be grayed-out when an object is not currently selected.
The Show All button will mark all objects in the Details Panel as visible. This button will only be visible when the dialog is displayed showing hidden objects. To do so use the SetShowHidden call.
The Hide All button will mark all objects in the Details Panel as hidden. This button will only be visible when the dialog is displayed showing hidden objects. To do so use the SetShowHidden call.
The OK button closes the dialog. If changes have been made to the DataSource with the DataSourceEditor that have not been saved to file, the user will be prompted to save these changes.
The Save button saves the contents of the DataSource to the file from which it was loaded. This button will be grayed-out when no changes have been made to the DataSource since it was last saved or loaded.
The Save As button saves the contents of the DataSource to file. The user will be prompted to specify the file to which the DataSource will be saved. Note that this button may be hidden using the AllowSaveAs method.
More information about the usage and functionality of the DataSourceEditor dialog can be found in the Getting Started Guide.
|
Constructor |
Description |
|
Creates a new instance of the DataSourceEditor class |
|
|
Creates a new instance of the DataSourceEditor class |
|
Method |
Description |
|
Enables or disables the ability for users to save the data source to a new file. |
|
|
Gets the URL that launches when the "Help" button is clicked |
|
|
Gets whether or not any child ObjectEditor dialogs offer the "Preview" button |
|
|
Gets the default folder in the DataView |
|
|
(Deprecated, use DataView instead) Returns the list of GC codes excluded |
|
|
(Deprecated, use DataView instead) Returns the list of GC codes included |
|
|
Returns the text displayed on the title bar of the dialog |
|
|
Property function to set the dialog preference to display (or not) the current datasources |
|
|
Sets the URL to launch when the "Help" button is clicked |
|
|
Sets whether or not any child ObjectEditor dialogs offer the "Preview" button |
|
|
Sets the colors that the editable and non-editable data source objects are displayed in |
|
|
Sets the DataView to use in the display (if you do not want to use the current DataSource default) |
|
|
Sets the default folder in the DataView |
|
|
(Deprecated, use DataView instead) Sets the list of GC codes to include |
|
|
(Deprecated, use DataView instead) Sets the list of GC codes to exclude |
|
|
If this is set to true, the user will be warned if the dialog is closed and there are unsaved datasource changes that were made outside of the dialog. (The user will always be prompted if there are unsaved changes that were made in the dialog). |
|
|
Sets the color that indicates an object is currently unusable (as in the cases where there are missing files or bad parameter definitions) |
|
|
Specifies the window that acts as the parent to this dialog |
|
|
If this is set to true, a "Show" column will display in the dialog, indicating via a checkbox whether a given object is hidden. Objects may be checked or unchecked to change this state. |
|
|
If this is set to true, a "None" object will be listed under every top-level object folder. This is only useful if the dialog is being used as a "Picker" to select an object. |
|
|
Sets the text that is displayed on the title bar of the dialog |
|
|
Shows the DataSourceEditor as a modal dialog |