 Map Layout Editor
Open
the Map Layout Editor from the Tools menu or with the  Map Layout Editor button in the File toolbar to display the New
Layout Options dialog (below).
Map Layout Editor button in the File toolbar to display the New
Layout Options dialog (below).
General steps for creating a Map Layout
-
Load your data into the workspace, analyzing, labeling, and creating any features or symbols you would like present as part of the map data.
-
Open the Map Layout Editor, and Define the Extent and size of your map by choosing to set up 2 or the 3 available options: paper size, data bounds, and scale. You can modify this later by editing the Map View Element.
To pre-populate the map with elements such as a title and scale bar, choose a Map Layout Template. -
Add the desired Map Layout Elements (scale bar, elevation legend, title, etc.) in the Map Layout Preview. Once added, Map Layout Elements may be edited by selecting with the mouse and right-clicking, or by double-clicking . Map Elements are not limited to cartographic elements. For example, any charts, graphs, 3D views that you have saved as an image may be added as an Image Element. Elements can also be grouped.
-
Add new pages for additional maps, or create a Map Book that auto generates pages using the current layout or a template.
-
Print or publish your map. Once the Map Layout is arranged to your satisfaction, the Map Layout Editor may be printed or exported to Geospatial PDF. Printing options will depend on the printer driver(s) available on your machine. It may be possible to make further adjustments to color and DPI settings, and you will want to verify that any page size selected in the Map Layout Definitions is also supported by your printer driver and hardware. For printing a larger poster on a series of smaller sheets to be stitched together, use the export to PDF as Mosaic.
Define the Extent
Choose two of the three available options to define the extent of your map. For more detailed information, see Defining a Map Layout on setting up the definitions used for creating a Map Layout or a Map Layout Template.
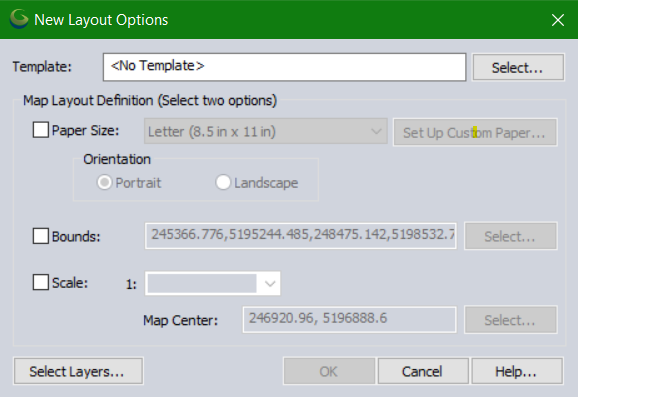
Prior to setting up the cartographic features, or Map Layout Elements , the Map Layout must first be defined in the options dialog. Map Layout definitions include; Paper Size, Bounds, and Scale. These are used to both set up the print size of your map, and the spatial extent of the workspace it will include.
Once the layout options are set, the Map Layout window may be floating or docked. For more information see Window Docking.
Choose which layers to include in your map
The Select Layers... option provides the ability to specify which layers will be included on each page in the Map Layout Editor. Select specific layers, or specify that all workspace layers be included.
When the All workspace layers check box is selected, the page will include all the layers currently in the workspace, and layers that get added later will automatically be included. If a group of individual layers is selected, new layers added to the workspace will not automatically be included. In either case, layers will be removed from the layout page when they are closed/removed from the workspace.
Map Layout Preview
Once you have setup the Map Layout Options, click 'OK' to open the Map Layout Editor (below). This is where Map Layout Elements such as the scale bar, elevation legend, margins, map legend and north arrow are added to the Map Layout.

In the upper left corner of the Map Layout Editor window are both menu and toolbar options for use in editing and adding elements to the Map Layout, in addition to loading or saving a new or existing Map Layout or Map Layout Template.
To change which layers are displayed on a page, right click on the page in the Control Center on the left side of Map Layout Editor window and choose Select Layers...
If one map page is selected, layers from that page will be used to initialize the check box state on the layer selection dialog.
If multiple pages are selected, layer selection dialog will be in its default state, with all layers selected.
The selected layers will be assigned to all of the selected pages.
Map Layout Editor Toolbar Buttons
-
 Create New Layout - Open the Map Layout Options dialog box to set up a new layout. The new Map Layout completely replaces the current one, so any elements defined so far will be lost and it will be necessary to specify a new page size, bounds, etc.
 -
 Open a Saved Template - Use a previously defined template on the current map. Template Definitions include the paper size, bounds, scale, and displayed map elements.
 -
 Save the current Layout as a Template - If you are setting up a new layout, or have loaded an existing template to modify, use this option to save the new Map Layout as a template.
 -
 Create a MapBook from the Current Layout - Create multiple pages based on a template and a tile scheme of data.
 -
 Create Feature MapBook - Create multiple pages based on a template and centering on selected vector features.
 -
 Add a New Element - Adds a new Map Layout Element to the Map Layout Preview. Map Layout Elements include:
- Elevation Legend Element...Insert a new Elevation Legend element into the Map Layout.
- Image Element...Insert a new image element into the Map Layout (JPG, GIF, PNG, TIF, EMF).
- Map Legend Element...Insert a new Map Legend element into the Map Layout.
- North Arrow Element...Insert a new North Arrow element into the Map Layout.
- Scale Bar Element... Insert a new Scale Bar element into the layout.
- Text Element... Insert a new Text element into the layout.
- Inset Map Element... Insert a Inset Map static image of the 2D, 3D, or Path Profile views.
- Group Elements... Create a new Group element that incorporates the currently selected elements.
- Ungroup Selected Elements... Removes selected elements from the group.
- Ungroup Contained Elements... Removes the group associated with the selected elements.
-
 Delete Selected Elements - Delete the selected element(s) from the layout.
 -
 Edit Selected Element - Edit the properties associated with the selected map element.
 -
 Show Map Element Control Center - Displays the Map Element Control Center.
 -
 Undo - Undo the last change to the map layout.
 -
 Redo - The Redo function reverses the most recent Undo operation.
 -
 Zoom In - This will Zoom in one level per click, increasing the visible detail of features on the map layout, decreasing the spatial extent.
-
 Zoom Out - This will zoom out one level per click, decreasing the visible detail of features on the map layout and increasing the spatial extent.
-
 Pan (Grab and Drag) - Changes the center point of the image without changing the magnification, depress the left mouse button, drag the view to the desired location, then release the left mouse button to redraw the view at the new location. This tool is also available through the keyboard shortcut of holding down the mouse wheel.
 -
 Full View - Zoom to the full page extent of the layout.
 -
 Show or Hide the Ruler Bars - Will either display or hide the ruler bars on the top and left sides of the Map Layout Preview, the rulers show the size of the page on the printed map. The ruler displays the size of the page, and added elements on the final printed map.
-
 View/Change the current page size - This can be used to change the Bounds of a Map Layout after Map Layout Elements have been added. Dynamic elements will update in response to changes in the page size
There are also map layout, element editing, and creation tools available in the Map Layout Menu Options.
Selecting and Positioning Map Layout Elements
If the margin is currently selected, then the current selection of the margin must be cleared prior to selecting a Map Layout Element for resizing or repositioning. This may be achieved by hitting the ESC button, or by left-clicking outside of the margin boundaries. To manually change the position of an element, select the element with your mouse and drag to move it - or use one of the right-click options to align elements with margins or other elements.
The size of an element may also be changed using your mouse, to lock the aspect ration of an element, use one of the corner nodes. To increase the size of a selected element in one direction only, use a node on the side. Holding the SHIFT button down while dragging the side or corner of an element will also disable the aspect ration lock.
The ability to snap features together can be enabled in preferences.
Creating a Map Template
A best practice for consistent map styling is to create a set of map templates with predefined layouts. Map Templates can also be used in the creation of a multi-page Map Book.
There are a number of built in Map Templates available as a starting point for creating a new map layout, including portrait and landscape oriented options with set legends, titles, and other map elements.
Integrate text macros with a Map Template to create variable text. Custom macros can also be defined
Keyboard Shortcuts:
- Esc Key - Deselect the selected element
- Delete Key - Delete the selected element
- Home Key - Show the full page on screen
- Mouse Wheel - Pan around the page
- Arrow Keys - Make a fine adjustment to the position of selected map layout element(s). The element will be moved a small distance in the direction of the key that is pressed (up, down, left or right).
- Ctrl + C - Copy the selected element
- Ctrl + V - Paste the selected element
- Ctrl + Z - Undo
- Ctrl + Y - Redo
The Map Layout Template allows you to save and reuse specific settings for the cartographic elements used to define a Map Layout, such as; neat lines, legend, scales, non-map graphics, and text overlays. With a Map Layout template, these elements, and their associated style(s) are preserved and can be used with alternate map data and workspaces. When loading a Map Template, you will be prompted to select the Scale or Bounds of the Map Layout.