TMS (Tile Map Service) Tiles
Connect to TMS
To load TMS data into Global Mapper, use the Connect to Online Data tool . Use the Add New Source... button to specify a url or path to the data. If the TMS source was exported from Global Mapper, it can be connected to using the Add Sources from File... option, and pointing to the *.gm_source_def.xml file included in the export directory.
Export TMS
The Export TMS Tiles commands allows the user to export any loaded vector data sets to an TMS Tiles format file.
To export TMS tiles, go to File > Export Web Format... and select TMS (Tile Map Service) Tiles as the export format. Individual layers can also be exported from the Control Center by right-click on the layer and going to Layer > EXPORT.
When selected, the command displays the TMS Tiles Export Options dialog which consists of an Export Bounds panel that allows the user to set up the portion of the loaded data they wish to export.
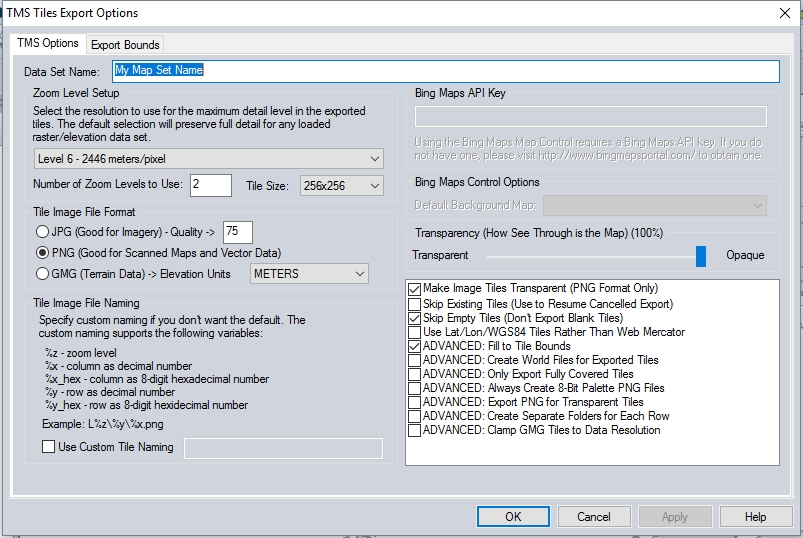
Zoom Level Setup
Select the highest detail zoom level to export from the drop down. The zoom level number, as well as approximate meters/pixel are listed for the format. The dialog will automatically recommend a zoom level based on the loaded data.
Enter Number of Zoom Levels to Use to specify the number of lower resolution zoom levels that will be included in the export.
Specify the Tile Size of each tile. Note this is an advanced setting, as many of the tile formats only officially support the default tile size.
Tile Image File Format
Specify the file format to use for the individual tiles.
Tile Image File Naming
The default tiling naming will follow the standard for the format. To use a different tile naming scheme, check the Use Custom Tile Naming box, and build the name with the following variables:
- %z - zoom level
- %x - column as decimal number
- %x_hex - column as 8-digit hexadecimal number
- %y-row as decimal number
Example: L%z\%y\%x.png would create a tile in the destination at \L5\9\11.png
Transparency (How See Through is the Map)
With the transparency slider all the way to the right, the output tiles will be entirely opaque, and no background or basemap will be visible in the area of the data. This slider controls the overall transparency of the features or rasters, and is different the advanced option for PNG files to makes the background of the tile transparent. Note that only PNG format supports image transparency, so with JPG specified as the tile image format, the loaded data will be lightened to show through to the map background color at the base of the tile.
The opacity value will be reported as a percentage next the section title.
Options
- Make Image Tiles Transparent (PNG Format Only) - This option will make the background of the tile transparent, rather than the color of the map background. Only PNG files support transparency (it is not supported in JPG format), so the Tile Image File Format must be PNG for this to take effect.
- Save Vector Data if Displayed - This option appears when vector data is loaded. Check this to include the vector data as part of the image on the tiles.
- Skip Existing Tiles -Check this option to continue an export that was partially completed, or completed for a different zoom level range. The current export will skip writing of any tiles that already exist in the output directory. (Note this is dependent on specifying the same output directory and tile image file naming settings.
- Skip Empty Tiles - Tiles that do not contain any data will not be written if this setting is checked. The default of unchecked will create a complete coverage of tiles, even if some of the tiles are blank.
- Use Lat/Lon.WGS84 Tiles Rather Than Web Mercator - The standard format for TMS tiles is Web Mercator. Check this option to instead export the tiles in Geographic WGS84 projection (unprojected Plate Carrée).
Advanced Options
- Fill to Tile Bounds -Check this option to expand the designated bounds of the tiles to coincide with the bounds of the tiles at the lowest zoom level being exported. This setting keeps the coverage of data consistent across all the zoom levels.
- Create World Files for Exported Tiles -Check this option to generate a world file for each exported tile.
- Only Export Fully Covered Tiles -This will limit the export to only tiles that are completely within the specified bounds, thereby canceling the export of tiles that would have partial coverage.
- Always Create 8-Bit Palette PNG Files -Data with many color variations will export as 24-BIT RGB tiles. Check this option to produce only 8-BIT palette images with a limited palette of 256 colors or less. This will create smaller files.
- Export PNG for Transparent Tiles -Enable this option to selectively export PNG files only for tiles that require transparency.
- Create Separate Folder for Each Row -For formats that do not create a row folder (BING Maps), this setting will divide the output into row folders. Each individual filename will still be the full quad name.
- Clamp GMG Tiles to Data Resolution - This option will reduce the pixel dimensions of the most detailed zoom level to match the actual data resolution, instead of oversampling the data to match the pre-defined zoom level resolution.