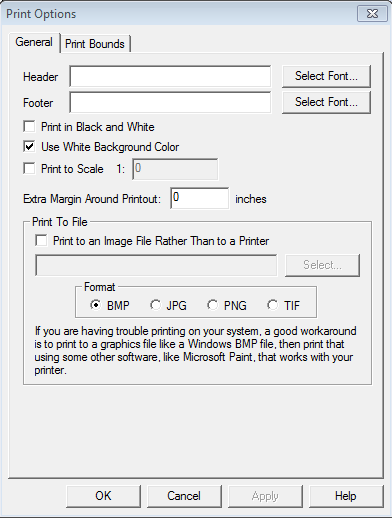
The Print command allows the user to print the contents of the current view window. When selected the Print Options dialog (pictured below) is displayed, which allows the user to set up the print process.

The Header field allows the user to specify the text to be displayed above the printed map image. This text will be printed centered above the map image on the printout. Use /n to insert a Header with multiple lines.
Example
Header: First Line\nSecond Line\nThird Line
Prints:
First Line
Second Line
Third Line
An additional / is an escape key, so 'first //next' will print as 'first /next'
The Footer field allows the user to specify text to be displayed below the printed map image. This text will be printed centered below the map image on the printout. The footer text will default to the text displayed on the status bar for the active tool, such as the measurement information for the current measurement in the Measure Tool. Use /n to insert a line break for a footer with multiple lines. See the example above.
Selecting the Print in Black and White option causes the printout to be generated in black and white, rather than full color even when printing to a color printer. The generated image will be a 256-level grayscale image.
Selecting the Use White Background Color option causes any background areas being printed to be filled with white so as not to use any printer ink. Uncheck this option for the currently configured background color to be maintained on the printout.
The Extra Margin Around Printout setting allows the user to specify an extra margin to draw around the output. This is useful when printing to things like a PDF file that do not have any natural margins like a printer does.
The Print To Scale option allows the user to specify that the printed result to match a certain scale (ie; 1:1000). This means that one inch on the printed paper will correspond to 1000 inches in the real world. If you choose to print to a certain scale, the printout will be centered on the center of the current screen view, but the appropriate amount of information will be rendered to achieve the requested scale.
The Print To File section allows the user to specify that the printout be directed to an image file rather than to the printer.
The Print Bounds panel allows the user to select exactly what area to print (the default is the current screen contents). This panel behaves just like the Export Bounds panel found on most export dialogs.
Print Preview
The Print Preview command allows the user to preview what a printout of the contents of the current view window would look like.
Print Setup
The Print Setup command allows the user to setup their printer for printing the current view window.