
After selecting the Create Range Ring(s) pop up menu option, place the center location of the range rings by left clicking at the desired location. If point features are selected when this option is activated, the user can also choose to create the rings centered on the selected point feature(s) rather than manually specifying a center location.
To cancel creation of the range ring(s) at any time, press the Escape key or right click with the mouse.
If choosing to create new range rings at selected point locations and those points have a RING_RAD_M attribute, that attribute value will be interpreted as the ring radius in meters and used rather than what is specified in the dialog described below.
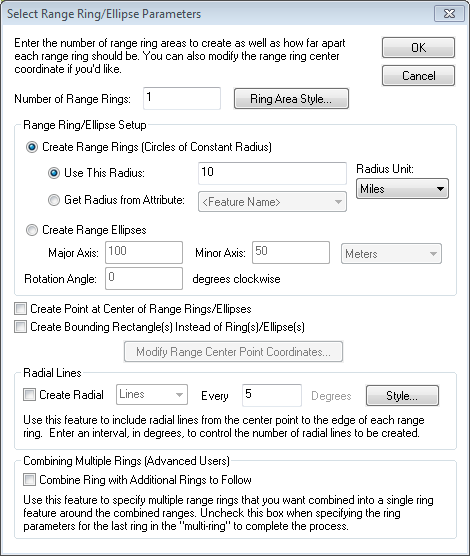
After selecting the center of the range ring(s), the Select Range Ring Parameters dialog (pictured below) appears and allows the user to setup how many range rings to be created and how far apart to create them.
Once creating the range ring(s) is completed, the Digitizer Tool will remain in the range ring creation mode. Simply left-click to create additional range rings centered on another location, or right-click to choose a different mode.

Choose to generate circles of constant radius of ellipses.
Specify a radius value, or choose to calculate the radius from an attribute value of the selected point feature(s).
To used a fixed value, enter the value and in the Use This Radius box, and specify the Radius Unit.
The Get Radius from Attribute drop down will provide a list of attributes from the currently selected point features. Choose a numeric attribute to use for the radius. If the attribute value contains a unit, that unit will be used.
If the attribute does not have a unit, the Radius Unit from the dialog will be used.
To Create Range Ellipses, specify the Major Axis radius and Minor Axis radius. The major axis will be measured in the north to south direction with a rotation value of 0. Specify an alternative rotation value in degrees to rotate the ellipses clockwise.
Check this option to also create a point feature at the center.
The user can choose to create squares or rectangles with the specified raduis as half the width, rather than a ring or ellipsis.
Choose this button to update the clicked location.
The radial lines option will generate line features to subdivide the range area. They are calculated based on a repeating angle measure from the center point. Radial lines may be generated for rings or squares, but are not available for ellipses.
Checking the multi-ring box will delay the actual range ring creation until additional range rings have been added and the box has been unchecked. Then all rings in the "multi-ring" will be combined if possible to build nice looking combined range rings. If a new Style... is not chosen, the default style drawing Range Rings will be used.