Loading Data from an ODBC Database Connection
In the Geographic Calculator, you are able to load, convert, and write back to a point database via an ODBC database connection. Supported Database connections include:
Loading Records
You can load the complete contents of a point database into the point database table for conversion. This may not be practical for large files (databases containing over 100,000 records). For most databases, you will want to partially load the database and process the data in the same manner as loading in a large ASCII file. To load in your data:
-
Select ODBC from the Type dropdown list. Make sure that the checkbox "Only the first ___ records" is checked. Enter a smaller number of rows to load, the default is 50. Click the Browse (...) button to select a table.
-
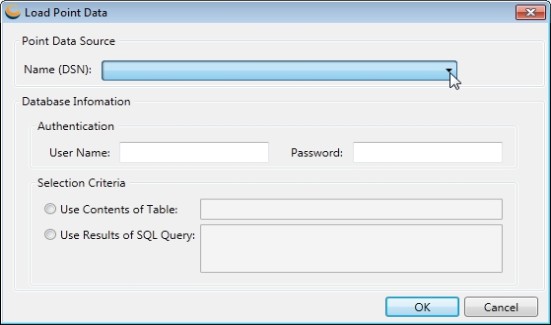
In the Database Information area, specify the user name and password (if necessary) and either the name of the table or a SQL Query
-
Click OK to load the data. Only a subset of the records (the number specified) will be loaded and displayed in the point database grid.
-
Set up a calculation like normal.
Note: When adding new columns to a database, processing times will be significantly slower, due to the need to configure the database during the process. Fastest times are achieved by writing to existing columns. If possible, configuring new columns in your database prior to conversion is recommended.
-
In the Output Data area, select a Type from the drop-down list. If you select a spatial database type, you will be prompted to enter information about that database and to select a database table.
If you want to save your point database as a file, choose File as the type, and click the "..." button. Select a file path, name, and type. If you choose to save as a vector file, an Export Settings dialog will open, with your column settings and output coordinate system automatically set. This is to confirm which coordinates to use as the output geometry in the vector format.
-
Click the Preview button to process the records in the grid. This allows you to check your conversion and column settings, and confirm that everything is set as you wish before you process the entire file.
-
Click the Process button to process the entire file and save it directly to your chosen output data type and location.
Using this method, there is no upper limit to the size of a point database you can process in the Calculator. You are limited only by your hard disk storage.