Coordinate System Definitions
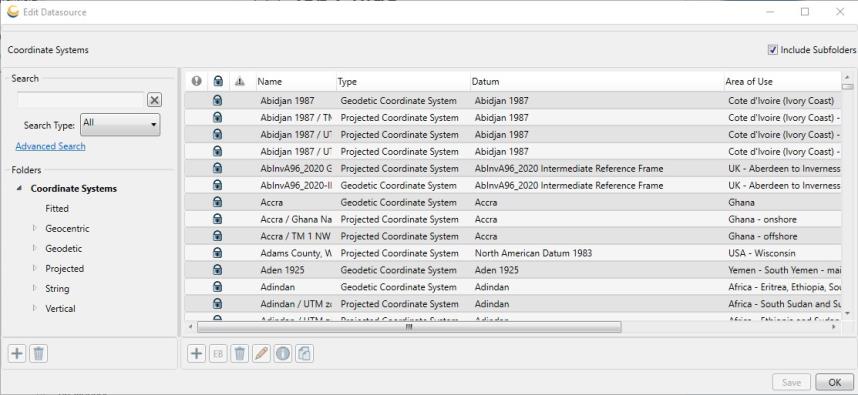
The Edit Datasource dialog allows you to add, change and delete user-defined Coordinate Systems, and to view all Coordinate Systems. The Coordinate System definitions can be viewed or edited through the Datasource menu.
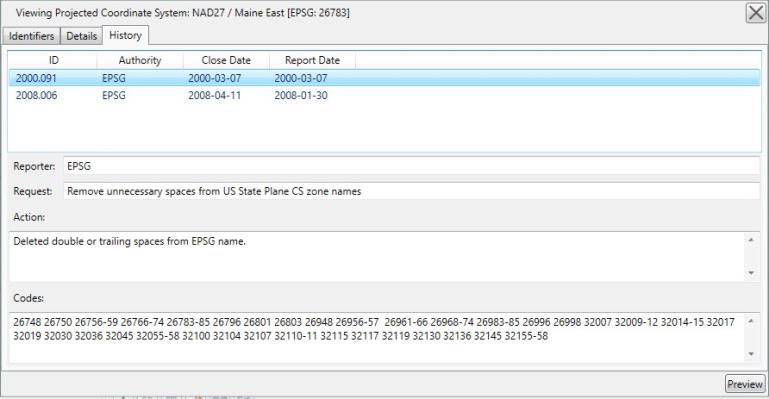
To view information about a coordinate system, from the datasource dialog, select a system and right-click to 'View Info'. The information dialog will have the following tabs:
Identification, Definition, and History. The Identification and Definition
tabs are editable, and covered under Create a new Coordinate System. The History tab is present in EPSG
defined coordinate systems only, History items are view only so will not
be carried over to copied objects.
The table on the History
tab will contain four columns of data: ID, Authority, Report Date and
Close Date. There is a row for each historical change in the selected
object. The unique identifier
for a change is a string based on the date of the EPSG report.

When one of the rows is selected, the fields on the bottom will display
the rest of the data for that particular history item.
Create a new Coordinate System
-
Go to Datasource>Coordinate System Definitions. An Edit Datasource dialog will open. You will have the option of viewing and editing Fitted, Geocentric, Geodetic, Projected, String, and Vertical Coordinate Systems.

-
Right-click in the right-hand pane and select New Object, or click the Add (+) button below the pane. A new blank Coordinate System Editor dialog will open, based on the currently selected folder type (Fitted, Geocentric, Geodetic, Projected, String, or Vertical). Another option is to copy an existing system by right-clicking on it and going to Copy Object
There are two tabs on all versions of the Coordinate System Editor:
Identification
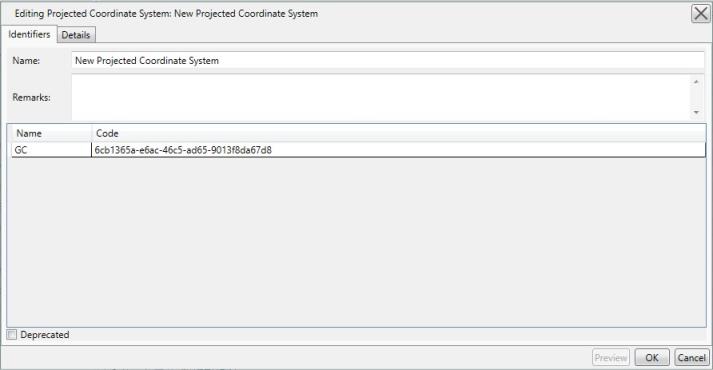
The Identification tab is used to name the object and associate identifying codes with it (if applicable).
- The Name field is where you need to enter the appropriate name for the definition; the name entered is the name that will be used to select the object in the main list.
- The Identifiers list may be used to add identifying codes for an object that may be referenced in other databases. The GC code is a unique identifier assigned by the Calculator which cannot be altered. To enter additional codes, right-click in the space below.
- The Remarks field can be used to add notes on a definition and is optional.
- Deprecated may be checked to indicate an object is no longer being used, either because there are errors in the definition, or because it has been superseded by another object. If this is checked, you will be provided with a date picker to set the date on which the object was deprecated. This will default to the current date.

Details
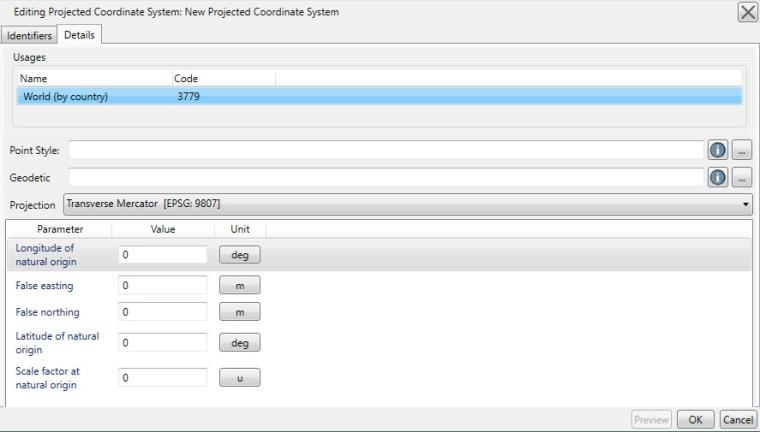
The Details tab is used to define the object's parameters. These will differ somewhat depending on the base type of the Coordinate System (Fitted, Geocentric, Geodetic, Projected, String, or Vertical). For all types, you must select a Usage definition, which contains an Area of Use and a Scope. If you are unsure of the appropriate Usage definition, you can leave it set to the default World envelope. The Point Style is how you will select the style of units for your system. For most Projected Coordinate Systems, you will want to select "Projected point in _____ (appropriate units)".
Projected Coordinate Systems require the selection of a Geodetic model that uses the appropriate datum for your system. When you select the appropriate Projection for your system, the parameters needed to define the system will appear in the table below. Enter the required parameters and select the units for each.

-
To save the definition permanently, click the Save button on the right hand side of the Edit Data Source dialog.
-
Click OK to close the Edit Datasource dialog, your new definition is complete and may be used within the Calculator.
Change an existing Coordinate System
-
Go to Datasource > Coordinate System Definitions. An Edit Data Source dialog will open.
-
Select the object from the Coordinate System list.
Note: You can only edit objects shown in blue. To modify a non- custom system right-click on the system and choose Copy Object to create a custom variation.
-
Double click the object you want to edit to open its definition.
-
To save the definition permanently, click the Save button on the right hand side of the Edit Data Source dialog.
Create an Early Bound Coordinate System
Early Bound coordinate systems are organized alongside the base type of their internal coordinate system. For example, if the EBCRS is built using UTM Zone 16, a projected coordinate system, it will show up under the Projected category in the editor dialog. To distinguish Early and Late bound CRS objects, there is a column inside of the GeoCalc dialog called “IsEBCS” (as seen in the screen shot above). By default this column is at the end of the table, but these columns can be moved as needed.
- Go to Datasource>Coordinate System Definitions. An Edit Data Source dialog will open.
- Select an existing Late Bound (projected or geodetic) CRS and either click the “EB” button or right-click and select “Promote to Early Bound.”
-
Select an appropriate transform, and that will generate a new Early Bound CRS with the original Late Bound CRS as its base. You may then edit it and save it, or cancel the operation.
-
Edit any of the values and press the OK button to create the Early Bound CRS.
-
To save the definition permanently, click the Save button on the right hand side of the Edit Data Source dialog.
Note: You cannot create a new Early Bound CRS from scratch, you must create one from an existing Late Bound CRS.
To edit an Early Bound CRS, select the object that you are interested in updating and either right-click and select “Edit”, or click the pencil button at the bottom of the coordinate system panel. This will bring up a standard looking edit dialog for the EBCRS object.
Delete an existing Coordinate System
-
Go to Datasource > Coordinate System Definitions. An Edit Data Source dialog will open.
-
Select the unit from the Coordinate System list.
Note: You can only delete objects shown in blue. If you want to hide other objects from the datasource view, see Datasource Filters.
-
Select the object, right-click it and select Delete Object or click the Trash Can button below the object list.
-
To save the deletion permanently, click the Save button on the right hand side of the Edit Data Source dialog.